- Blog
- Christmas decorations
- Step-by-Step Guide: How to Make Beautiful Christmas Decorations at Home

'Tis the season to deck the halls and make our homes merry and bright! With Christmas just around the corner, there's no better time to unleash your creativity and add a touch of festive magic to every nook and cranny.
But why spend big bucks on store-bought decorations when you can create stunning and personalized ornaments right in the comfort of your own humble abode? Grab your glue gun and dust off your craft supplies, because we have got you covered with this delightful step-by-step guide on how to craft exquisite Christmas decorations that will have everyone ooh-ing and aah-ing this holiday season. Ready to unleash your inner DIY genius? Let's get started!
Why Make Your Own Christmas Decorations?
Making your own Christmas decorations adds a personal touch to your holiday decor while offering a range of benefits.
Firstly, it allows you to unleash your creativity and customize your home according to your taste and style.
Secondly, crafting your own decorations can be a fun and rewarding activity for the entire family, fostering togetherness and creating lasting memories.
Additionally, DIY Christmas decorations are often more budget-friendly than store-bought options, saving you money. From handmade ornaments to festive wreaths and garlands, making your own Christmas decorations gives you the opportunity to infuse your home with unique and heartfelt festive spirit.
Materials Needed
To make beautiful Christmas decorations at home, you will need a few basic materials. These include:
- Craft Supplies: Stock up on items like glue, scissors, tape, ribbons, and strings to enhance your creativity.
- Decorative Elements: Gather ornaments, beads, buttons, and fabric scraps to add texture and visual appeal to your decorations.
- Natural Materials: Collect pinecones, twigs, dried flowers, and leaves to bring a touch of nature to your creations.
- Recycled Materials: Utilize old newspapers, magazines, or cardboard for making paper ornaments and garlands.
- Lighting: Consider using fairy lights, candles, or battery-operated LED lights to add a warm and festive glow to your decorations.
Remember, creativity knows no bounds, and you can always improvise with materials found around the house to make unique and personalized Christmas decorations.
Creating Beautiful Christmas Decorations
Christmas Decorations How to Make: Christmas Wreath
- Gather the materials: You'll need a wreath base, such as a wire or foam wreath form, along with greenery like pine branches or artificial foliage.
- Form the base: Attach the greenery to the wreath form using wire or floral tape, layering it evenly around the circle.
- Attach greenery: Add different types of greenery, like sprigs of holly or eucalyptus, to create texture and depth.
- Add decorative elements: Incorporate festive accents like pinecones, berries, or ornaments by wiring them onto the wreath.
- Hang and enjoy: Use a ribbon or hook to hang the wreath on your front door or decorate it with fairy lights for an extra touch.
Remember, you can personalize your wreath by choosing colors and elements that match your style and theme. Let your creativity shine as you design a beautiful Christmas wreath for your home.
Step 1: Gather the Materials
To start making beautiful Christmas decorations at home, the first step is to gather the necessary materials. Here are some items you will need:
- Greenery such as branches, pinecones, or artificial foliage
- Decorative elements like ribbons, ornaments, or bells
- Scissors and wire cutters for trimming and shaping
- Floral wire or hot glue gun for secure attachment
- Base materials such as a wreath frame, foam balls, or mason jars
- Additional materials like paper, fabric, or cinnamon sticks for specific projects
By ensuring you have all the materials ready beforehand, you can dive into creating your Christmas decorations smoothly and avoid any interruptions or delays. Remember, you can always customize the materials based on your personal preferences and the decoration you intend to make.
Step 2: Form the Base
In Step 2, you will form the base of your Christmas decoration. This step sets the foundation for your overall design. Start by selecting a sturdy material, such as a wire wreath frame or a foam cone, depending on your chosen decoration. Shape the material to create the desired structure, ensuring it is stable and secure. For a wreath, twist the wire frame into a circular shape, while for a centerpiece, shape the foam cone into a tapered form.
A well-formed base provides stability and ensures that your Christmas decoration will hold its shape throughout the holiday season.
Step 3: Attach Greenery
Decorating your Christmas wreath with greenery is a simple yet effective way to add a touch of nature and freshness. Begin by selecting your preferred greenery, such as pine branches or holly leaves. Cut the branches into smaller sections for easier attachment. Utilize wire or floral tape to secure the greenery to the wreath base, ensuring it is evenly distributed. Remember to overlap the branches for a fuller look. To enhance the visual appeal, consider adding additional elements like berries or pinecones. Experiment with different textures and colors to create a wreath that matches your style and complements your overall decor.
Step 4: Add Decorative Elements
Add decorative elements to your Christmas wreath to enhance its beauty. Opt for colorful ribbons, bows, or ornaments that complement your chosen theme. Secure them firmly using a hot glue gun or floral wire. Incorporating natural elements like pinecones, berries, or dried flowers can add a rustic touch. Consider using glitter or metallic spray paint to add some sparkle to your wreath. Experiment with different textures, such as silk flowers or fabric scraps, to create a unique look.
Remember toevenly distribute the decorative elements to maintain balance and visual appeal.
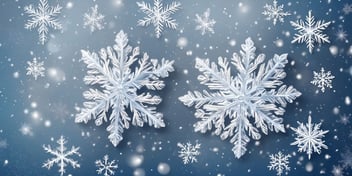
Christmas Decorations How to Make: Paper Snowflakes
To make beautiful paper snowflakes for Christmas decorations, start by choosing your desired paper. Regular white printer paper works well, but you can also use colored or patterned paper for a festive touch. Fold the paper multiple times to create a small triangle, and then cut out various shapes along the folded edges. Unfold the paper to reveal your unique snowflake design.
Finally, decorate the snowflakes with glitter, sequins, or even spray them with adhesive and sprinkle on some salt for a frosty effect. Hang them up with string or tape them to windows for a wintry ambiance.
Step 1: Choose Your Paper
When making Christmas decorations, the first step is to choose the right paper for your project. Opt for sturdy papers like cardstock or construction paper that can hold their shape well. Consider the color and texture of the paper to match your desired theme. For delicate and intricate designs, thinner papers like tissue paper work best.
Additionally, consider using patterned or specialty papers to add visual interest to your ornaments or snowflakes. Remember to choose paper that is easy to fold and cut, allowing you to create beautiful and intricate designs effortlessly.
Step 2: Fold the Paper
To create beautiful paper snowflakes for your Christmas decorations, start by folding the paper in a specific pattern. Begin with a square piece of paper and fold it diagonally to form a triangle. Next, fold the triangle in half once again to create a smaller triangle. Repeat the process by folding the triangle once more. Now, you should have a smaller folded triangle. Take the folded triangle and cut out small shapes along the edges to create intricate designs. Unfold the paper carefully to reveal your stunning snowflake. Experiment with different folding techniques and cut-out patterns for unique and eye-catching decorations.
Step 3: Cut Out the Design
Once you have folded your paper into the desired shape, it's time to cut out the design. Take a pair of sharp scissors and carefully follow the edges of your folded paper. Remember, precision is important here to achieve intricate and beautiful snowflake patterns. Start with simpler designs if you're new to paper cutting, gradually progressing to more complex ones. Experiment with different shapes and sizes to create unique snowflakes. Don't worry about making them perfect; imperfections can add character. Once you've finished cutting, unfold your paper to reveal a stunning snowflake ready for decoration.
Step 4: Unfold and Decorate
Once you have carefully cut out your paper snowflake design, it's time to unfold it and add some decorative touches. This step allows you to unleash your creativity and make each snowflake unique. Consider using glitter, sequins, or small beads to embellish your snowflake. You can also experiment with different colors by using markers, colored pencils, or watercolors.
Don't forget to hang your finished snowflakes using thread or fishing line to create a stunning winter wonderland effect when displayed in windows or from the ceiling. Let your imagination guide you in making each snowflake sparkle and stand out.
Christmas Decorations How to Make: Mason Jar Lanterns
To create charming Mason jar lanterns for your Christmas decorations, follow these simple steps:
- Step 1: Prepare the Mason jars by cleaning them thoroughly and ensuring they are dry.
- Step 2: Add festive decorations such as holly leaves, berries, or small ornaments inside the jars.
- Step 3: Insert a tea light or flameless LED candle into each jar.
- Step 4: Place the jars strategically around your home, on mantels or tables, to create a warm and cozy atmosphere.
- Tip: Customize your lanterns further by tying ribbons or twine around the jar lids.
Mason jar lanterns add a rustic and festive touch to your Christmas decor, providing a soft and inviting glow that enhances the holiday ambiance.
Step 1: Prepare the Mason Jars
- Clean the jars thoroughly with soap and warm water to remove any residue or labels.
- Dry them completely before starting the decorating process.
- Consider using rubbing alcohol to ensure a clean surface for better adhesion if you plan to paint or glue anything onto the jars.
- Remove the lids if you won't need them for your design.
- Inspect the jars for any cracks or chips, as these can affect the overall aesthetic and safety of your finished decoration.
- Select jars of various sizes to create visual interest and versatility in your Christmas decorations.
Step 2: Add Decorations
- Enhance the appeal of your Christmas decorations by adding thoughtful and creative embellishments.
- Consider incorporating elements like ribbons, glitter, artificial berries, or ornaments to bring a festive touch.
- Personalize your decorations with handmade touches, such as painted designs, stencils, or family photos attached to the ornaments.
- Experiment with various textures and colors to create a visually engaging display.
- Make use of natural materials like pinecones, dried flowers, or twigs for a rustic and charming look.
- Opt for versatile decorations that can be easily attached, such as adhesive hooks, strings, or hot glue.
- Remember to distribute decorations evenly and strategically to maintain a balanced and visually appealing arrangement.
Step 3: Insert the Candle
To add a warm and cozy glow to your Mason Jar Lanterns, carefully insert a small candle into the jar. Make sure the candle is secure and centered to prevent any accidents. Use either a regular or battery-operated candle, depending on your preference and safety concerns. You can experiment with different colored candles or scented ones to create a festive ambiance. To enhance the visual appeal, consider placing the lanterns in strategic locations around your home, such as on the mantel or as a centerpiece on the dining table. Remember to supervise the candles when they are lit for safety reasons.
Other Creative Christmas Decoration Ideas
Christmas Decorations How to Make: Pinecone Garland
One popular Christmas decoration that you can easily make at home is a pinecone garland. To create a pinecone garland, start by collecting pinecones of different sizes.
Next, attach twine or ribbon to each pinecone, making sure they are securely fastened. Hang the garland on a mantle, staircase, or around a door frame to add a rustic and festive touch to your home. For added flair, you can also paint the pinecones or sprinkle them with glitter. This simple DIY project is a great way to bring a natural element and warmth to your Christmas decor.
Christmas Decorations How to Make: Fabric Ornaments
- Choose festive fabric in different colors and patterns such as plaid, polka dots, or holiday-themed prints.
- Cut out shapes like stars, trees, or snowflakes from the fabric, ensuring they are symmetrical and neat.
- Add embellishments like sequins, beads, or buttons to enhance the ornament's appearance.
- Sew or glue the fabric pieces together, leaving a small opening to stuff them with stuffing or cotton.
- Close the opening securely and attach a loop or ribbon for hanging the ornament.
- Experiment with different fabrics and designs to create unique and personalized fabric ornaments.
- Hang them on the Christmas tree, decorate garlands, or use them to adorn gifts.
Fabric ornaments provide a charming and customizable touch to your Christmas décor. By following these simple steps, you can create beautiful and eye-catching decorations using fabric scraps or remnants.
Christmas Decorations How to Make: Cinnamon Stick Candle Holder
Looking for a festive and aromatic decoration? Try making a Cinnamon Stick Candle Holder. Here's how:
- Gather your materials: cinnamon sticks, a glass container, a hot glue gun, and a candle.
- Begin by applying a line of hot glue on one cinnamon stick and carefully attach it vertically to the glass container.
- Continue gluing the cinnamon sticks around the container until it is fully covered.
- Once the glue has dried, place a candle inside the container, ensuring it is secure.
The result? A charming holiday decoration that not only adds a warm, cozy touch to your home but also spreads a delightful cinnamon scent. Perfect for your Christmas table or as a thoughtful handmade gift.
Wrapping up
Learn how to create stunning Christmas decorations in the comfort of your own home with this step-by-step guide. From traditional ornaments to unique DIY crafts, this article provides easy-to-follow instructions that will help you add a festive touch to your holiday season. Whether you're a seasoned crafter or a beginner, you'll find plenty of ideas and inspiration to make your home merry and bright this Christmas.
Let your creativity flow as you transform ordinary materials into beautiful displays that will bring joy and enchantment to your loved ones. So gather your supplies and get ready to spread some holiday cheer with your homemade Christmas decorations!
Read On
Fill Your Home with Holiday Spirit: DIY Ideas for Christmas Decorations
The most magical time of the year is just around the corner, and it's the perfect moment to...

Deck the Halls: Easy DIY White Christmas Decorations for a Festive Home
It’s that merry time of the year again when the world transforms into a winter wonderland. As...

10 Festive Merry Christmas Snowflakes Crafts to Brighten Your Home
The holiday season is upon us, and there's nothing quite like the joy and cheer that comes with...